
In this blog, I discuss how I deployed my app to AWS Amplify through Github actions. However, you can deploy to any cloud provider and service of your choice by following this method.
Towards the end, I have also embedded the Terraform scripts and GitHub actions I used to achieve this.
GitHub actions make our lives easier by providing a marketplace of pre-existing actions that we can choose from. For example, deploying to AWS using these plugins is a cakewalk.
Traditionally, this was done by maintaining aws_access_keyand aws_secret_keyas a secrets in our GitHub repository. This has always been the weakest link in our infra as we may accidentally expose our keys to the outside world.
But maybe we can do better…
Behind the scenes:
Here is a fun fact for you — GitHub implements OpenID connect (or OIDC in short). OIDC is a protocol (which is built on top of OAuth 2.0). You might have used OAuth for passwordless authentication without even realizing it!
Similarly, you can make Github talk to your cloud provider using this protocol behind the scenes. However, since the steps for doing this were not collated in one place, I decided to document the process.
In my case, I am deploying my app to AWS Amplify.
TL;DR: We use IAM:AssumeRole to get the role we want in the GitHub runner. The readme of the GitHub action you are going to use is your best guide; the documentation is pretty good. Since I am connecting to AWS, I am using this GitHub action — https://github.com/aws-actions/configure-aws-credentials
Steps to achieve this:
- Add GitHub OIDC as an
Identity Providerin your Cloud. You can do this manually or through IaaC (say Terraform). (Link for Terraform module — https://registry.terraform.io/providers/hashicorp/aws/latest/docs/resources/iam_openid_connect_provider)
Things to add in the required fields are provided by Github here.
Alternatively, you can use this terraform module, which does a lot of the heavy lifting for you. - After step 1, you should have an OIDC Provider in IAM (AWS) like this:
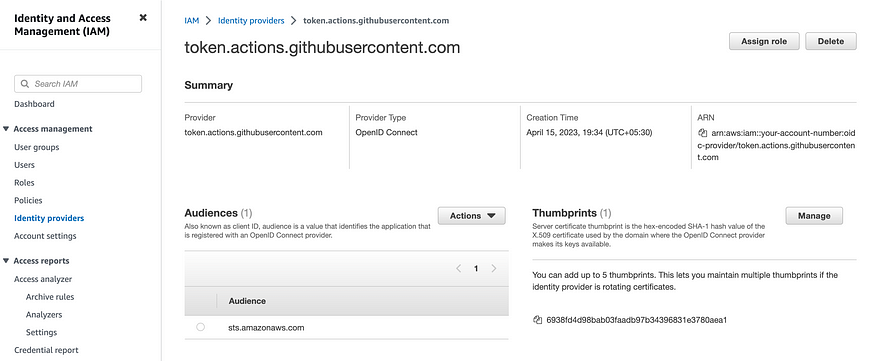
This is how AWS communicates with GitHub behind the scenes. Now it is time for you to create a role that your GitHub runner will assume. Remember, you don’t need to give a token to assume a role, AWS & Github will do this behind the scenes for you.
3. Now that you have set up your identity provider, it is time to create a role which will be used by Github when the pipeline runs. An example cloudformation template to create this role is given here. Note: Here you are giving the resource ID of the openID provider you created in the previous step (ARN in the case of AWS). You can also choose to do this with IaaC of your choice.
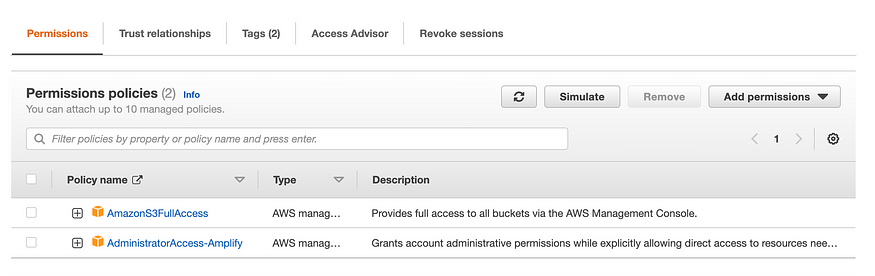
5. This role will have `AssumeRole` trust-relation by default (you can check from the cloud-formation YAML file provided). One of the things you have to configure is — what policies does this role have? I deploy my app to Amplify using Terraform. Terraform requires S3 access and my GitHub action uses amplify deploy command. Therefore, I’ve given these two permissions for this role.
6. In your GitHub pipeline, you need to give Github this permission:
permissions:
contents: read
id-token: write # This is the missing permission (YMMV depending on presence or absence of this)
7. Once you are done, you can use the action in your job like this:
- name: Configure AWS Credentials
uses: aws-actions/configure-aws-credentials@v2
with:
role-to-assume: arn:aws:iam::your-account-ID:role/github-oidc-setup-Role
aws-region: YOUR-REGION
That’s it! Now your GitHub pipeline can run without you ever adding AWS keys into your CI.
Note: You can still commit your keys and use it for this action like this:
- name: Configure AWS Credentials
uses: aws-actions/configure-aws-credentials@v2
with:
aws-access-key-id: ${{ secrets.AWS_ACCESS_KEY_ID }}
aws-secret-access-key: ${{ secrets.AWS_SECRET_ACCESS_KEY }}
aws-region: us-east-2
role-to-assume: ${{ secrets.AWS_ROLE_TO_ASSUME }}
role-external-id: ${{ secrets.AWS_ROLE_EXTERNAL_ID }}
role-duration-seconds: 1200
role-session-name: MySessionName
If you are curious how OIDC or OAuth work behind the scenes, I recommend this wonderful video from Okta: https://www.youtube.com/watch?v=996OiexHze0
As promised, here are the terraform scripts and GitHub actions I used to achieve this.
Terraform scripts:
GitHub action:

